+86-25-8470-5507


Views: 0 Author: Site Editor Publish Time: 2026-09-20 Origin: Site


You are lying in the dirt beneath a skid steer, or maybe standing beside a heavy-duty agricultural tractor. Grease gun in hand, you are ready to knock out routine maintenance. You snap the coupler onto the zerk, pump the handle, and hit a brick wall. The lever refuses to budge. It feels welded shut.
Frustration sets in immediately. Equipment downtime drains profitability by the minute. Tearing down a heavy machinery joint, pivot pin, or bearing assembly just to fix a lubrication failure is an incredibly labor-intensive nightmare. Fortunately, that exhausting teardown is rarely necessary. By combining mechanical intuition with targeted techniques, you can break through hardened debris and restore fluid pathways. In this field guide, we will walk through diagnosing the exact nature of the blockage, safely bleeding off trapped hydraulic pressure, and deploying a clogged grease fitting protocol that gets your machinery back to work without turning a wrench on the main assembly.
Isolate the Clog: Differentiate between a mechanically seized zerk fitting and a deep internal blockage within the pin's grease passage.
Respect the Pressure: Understand the severe physical hazards of hydraulic lock in grease lines and how to bleed the system safely.
Deploy Hydraulic Shock: Learn why kinetic fluid shock is vastly superior to brute force for shattering hardened soap thickeners.
Follow a Tear-Down-Free Method: Execute a field-tested process utilizing penetrating solvents, targeted thermal energy, and mechanical force.
Adopt Condition-Based Care: Implement actionable maintenance strategies to stop fittings from choking up in abrasive or freezing environments.
Before you start swinging hammers or firing up a heat gun, you must diagnose exactly where the restriction lives. Blindly forcing a high-pressure grease gun onto a stubborn joint usually leads to blown seals or shattered couplers. Taking three minutes to properly assess the dead-head resistance will save you hours of busted knuckles and wasted labor.
When a lubrication system is healthy, grease flows with smooth, predictable resistance. A blockage typically announces itself in one of two distinct ways. First, you might experience severe "bypass." This happens when internal back-pressure is so high that fresh grease simply ejects out the sides of the coupler, making a mess on the external casting rather than entering the bearing. Alternatively, you will encounter a dead hydraulic lock. If you are using a manual lever gun, the handle becomes rock solid. Squeezing it harder will not work; the fluid simply has nowhere to go.
The most critical diagnostic step is isolating the variable. Is the tiny check ball inside the nipple seized with rust, or has the entire internal cavity of the pivot pin turned into solid cement?
To find out, take a wrench and unscrew the zerk fitting directly from the machine. Snap it into your grease gun while it is detached and give it a pump. If a ribbon of grease flows freely through the removed part, the fitting is perfectly fine. Your problem lies deep within the equipment's metal passage. Conversely, if the detached fitting remains stubbornly blocked, the internal spring mechanism has failed. In that case, you can either attempt to free the check ball using a dedicated zerk fitting cleaner or simply toss the dead zerk in the trash and thread in a new one.
Understanding the chemistry and environmental factors behind these blockages is essential. Lubricants do not simply vanish. They degrade, separate, and transform under extreme mechanical stress and neglect.
Industrial greases are essentially a mixture of a base lubricating oil suspended in a thickener—usually a lithium, calcium, or polyurea soap. Over extended periods of inactivity or under extreme operating temperatures, the base oil can bleed out of the mixture and leak away. What remains trapped inside the passage is the dry, chalky thickener. This degraded material acts exactly like a hardened clay plug, completely sealing off the pathway.
Furthermore, heavy machinery lives in hostile environments. Excavators, loaders, and tractors are constantly bathed in silica dust, mud, and grit. If an operator fails to thoroughly wipe the tip of a zerk before attaching the grease gun, they are effectively injecting abrasive sand directly into the joint under high pressure. Inside the dark, narrow confines of the pin groove, this dirt mixes with the remaining grease to form an impenetrable sludge. Add a little water ingress from an aggressive pressure washer, and you have a recipe for severe internal scaling.
Ambient temperature also dramatically alters fluid dynamics. During winter maintenance, a joint that took grease perfectly in July might suddenly refuse it in January. Freezing temperatures cause the viscosity of both the base oil and the thickener to skyrocket. This cold-induced thickening can temporarily lock the tiny spring-loaded check ball in place and make the internal grease too rigid to displace.
Intervening in a blocked hydraulic or lubrication system introduces genuine physical hazards. Trapped mechanical energy demands absolute respect. Mishandling a pressurized grease line can result in painful fluid injection injuries or damaged equipment.
Fluids are inherently incompressible. A standard manual lever grease gun is capable of generating an astonishing 10,000 PSI (pounds per square inch). When you force grease against a solid, unyielding clog, the system enters a state of hydraulic lock. The flexible rubber hose expands under the strain, and the metal jaws of the coupler bite down onto the zerk fitting with immense clamping force. If you continue to pump, the weakest link in the chain will fail violently. This could mean a ruptured hose whipping through the air or a shattered metal coupler turning into shrapnel.
If your grease gun lever stalls out, stop immediately. Your first instinct might be to violently yank or twist the coupler off the fitting. Do not do this. The extreme internal pressure is forcing the coupler's jaws to lock onto the zerk. Pulling it straight off will often snap the fitting clean off at the threads, leaving you with a broken stud stuck in the machine casting.
Instead, safely relieve the pressure by slightly unscrewing the knurled outer collar of the grease gun coupler. This action loosens the internal jaws, allowing a tiny amount of trapped grease to bleed out. The pressure will instantly drop to zero, allowing you to slide the coupler off effortlessly.
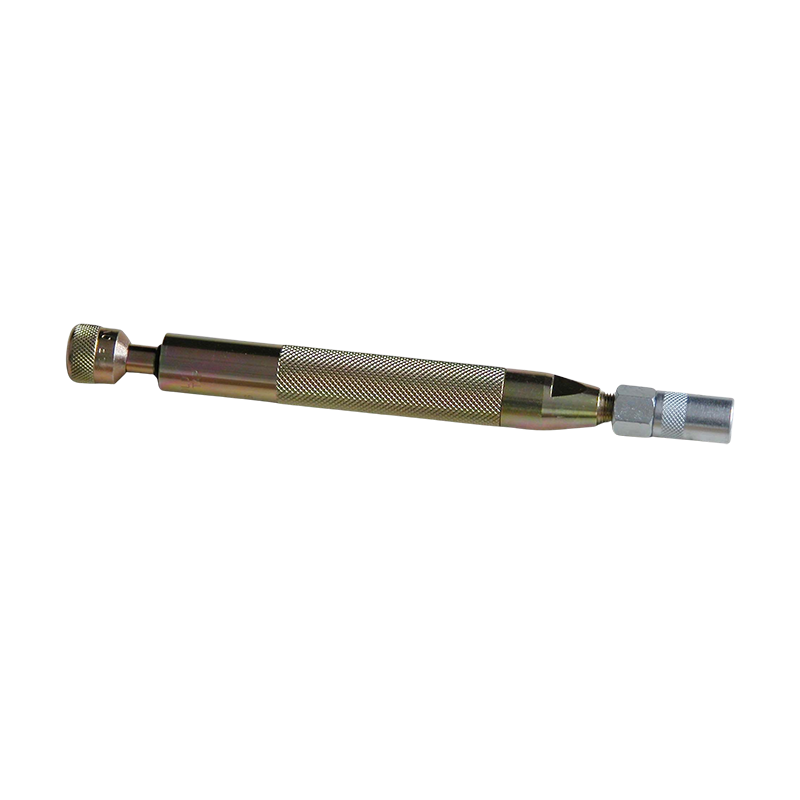
When brute force fails, veteran mechanics rely on a specific arsenal of tools designed to break down the chemical structure of the clog while applying targeted, safe mechanical energy. The undisputed champion of non-destructive clearing is the grease fitting cleaner tool.
This specialized device looks like a heavy-duty steel syringe. Rather than relying on steady, continuous pressure like a grease gun, it operates on the principle of kinetic hydraulic shock. High-quality kits—like those featuring precision-machined steel cylinders and high-pressure piston mechanisms—allow you to inject a light-viscosity penetrating oil directly into the blockage. You attach it to the stubborn zerk and strike the plunger piston with a hammer. The sudden, high-intensity shockwave fractures the hardened soap thickener, while the penetrating solvent floods the micro-cracks to dissolve the debris.
| Method | Mechanism of Action | Risk of Equipment Damage | Time Required |
|---|---|---|---|
| Brute Force (High-Pressure Gun) | Continuous static pressure | High (Blown seals, shattered couplers) | Minutes (but often fails) |
| Drilling / Boring | Physical material removal | Extreme (Metal shavings score bearings) | Hours |
| Hydraulic Shock Cleaner Tool | Kinetic shockwave + solvent breakdown | Zero (Non-destructive fluid dynamics) | Under 5 minutes |
Standard heavy grease cannot dissolve hardened grease. You need chemical intervention. High-quality penetrating oils are formulated with extremely low surface tension, allowing them to seep into microscopic crevices and break down the molecular bonds of the clay-like residue.
In addition to solvents, thermal energy is a fantastic way to lower the viscosity of dried lubricants. A standard industrial electric heat gun is the perfect tool for this job. Notice the emphasis on a heat gun—never use an open-flame oxy-acetylene torch for this task. Uncontrolled fire will rapidly incinerate rubber dust boots, melt internal polyurethane seals, and ruin the structural temper of the steel pin.
Restoring fluid flow requires a methodical approach. By combining the tools mentioned above, you can safely clear almost any restriction without resorting to a heavy teardown.
Step 1: Clean the Exterior. Grab a shop rag, a wire brush, and a quick-evaporating degreaser. Scrub the zerk fitting and the surrounding metal housing until it is spotless. The last thing you want to do is complicate an internal clog by inadvertently pushing external sand and silica into the bearing cavity during the clearing process.
Step 2: Apply Targeted Heat. Power up your industrial heat gun on a medium-high setting. Hold it a few inches from the metal housing that surrounds the grease passage. Keep the gun moving constantly in a sweeping motion to prevent localized hot spots. Monitor the temperature; the metal should become hot to the touch, but you must keep the heat away from any adjacent rubber seals. Allow the thermal energy a few minutes to saturate the metal and soften the old grease inside.
Step 3: Clear the Zerk Check Ball. Take a sharp dental pick and gently depress the tiny steel ball located at the tip of the fitting. It should yield slightly and spring right back. If it is crusted over with rust, apply a single drop of penetrating oil directly to the ball and work it back and forth.
Step 4: Deploy the Cleaner Tool. Fill the barrel of your cleaner tool with a premium penetrating solvent. Bleed out any trapped air, then firmly snap the tool's coupler onto the zerk, ensuring it sits perfectly straight. Take a lightweight hammer—such as a 16-ounce ball-peen—and deliver a firm, square tap to the tool's plunger. Do not swing like you are driving a railroad spike. The objective is to create a sharp, sudden acoustic shockwave through the fluid. Deliver several moderate taps. When the clog finally fractures, you will feel the plunger suddenly drive forward with a satisfying release.
Step 5: Flush and Re-Grease. Do not let the joint sit. Immediately remove the cleaner tool and attach your standard grease gun loaded with the manufacturer-recommended lubricant. Begin pumping. You should feel normal, smooth resistance. Keep pumping continuously until you see the old, discolored sludge and the thin penetrating solvent purge completely from the edges of the joint. Once you see fresh, clean grease weeping from the seals, the operation is a success.
Looking at the broader landscape of heavy equipment management, fleet operators are aggressively shifting toward predictive and condition-based maintenance models. With profit margins tightening across the construction, mining, and agricultural sectors, the cost of unexpected downtime is being scrutinized more than ever. The industry is rapidly moving away from reactive, "run-to-failure" mentalities.
Specifically, technicians are heavily prioritizing non-destructive intervention techniques. The cost of heavy machinery parts has skyrocketed. Instead of automatically scheduling a $2,000 pin-and-bushing replacement the moment a lubrication point fails, modern maintenance protocols dictate exhausting all hydraulic-shock and chemical-solvent options first. This industry-wide shift emphasizes the critical importance of specialized diagnostic and clearing tools. By extending the lifecycle of existing components without requiring heavy teardowns, maintenance teams are aligning perfectly with broader operational goals of cost reduction and equipment sustainability.
Veteran mechanics and heavy equipment operators have developed a few brilliant workarounds for machinery that has been neglected for years.
For equipment that has been sitting idle in a field for a decade, standard NLGI #2 grease might struggle to flow even after a clog is broken. A proven field hack is to keep a secondary, dedicated grease gun loaded with straight heavy gear oil (like 80W-90) or a very light #000 semi-fluid grease. After breaking the initial clog, hook up this secondary gun. The lighter fluid acts as an exceptional grease passage cleaner, rapidly flushing out abrasive particulates and washing away old soap thickeners. Once the joint moves freely, follow up with your standard heavy-duty grease to push the light oil out.
When patience runs thin, operators sometimes resort to destructive methods. Never, under any circumstances, use a high-speed drill bit to try and bore out a clogged grease passage. The drill bit will inevitably leave microscopic metal shavings deep inside the channel. Those shavings will travel directly into the bearing surface, causing catastrophic galling and premature failure under heavy load.
The most efficient way to handle a blocked fitting is to ensure it never happens in the first place. Adopting proactive habits will keep your machinery operating smoothly year-round.
Timing is everything. The absolute best time to grease heavy machinery is immediately at the end of a shift, while the pins, bushings, and joints are still hot from operation. Thermal expansion creates slightly more clearance within the joint, allowing new grease to flow beautifully. Greasing at the end of the day also purges any moisture, mud, or corrosive elements accumulated during work, preventing them from sitting inside the joint and hardening overnight.
Upgrading your equipment's infrastructure is a highly cost-effective preventative measure. Swap out standard steel zerks for heavy-duty, stainless steel alternatives that reject rust. Utilize locking grease couplers that provide a positive mechanical seal, preventing messy pressure loss. Most importantly, invest in a premium lubrication maintenance tool kit and protective accessories. Pressing brightly colored rubber zerk caps onto every fitting physically blocks environmental contaminants from reaching the check ball, drastically reducing your chances of ever dealing with a clog again.
Encountering a stubborn lubrication point does not have to ruin your workday. You do not need to spend hours swinging sledgehammers to disassemble a pivot joint simply because it refuses to take grease. By understanding the root causes of degraded lubricants and respecting the physics of hydraulic pressure, you can tackle the problem intelligently.
Equipping yourself with patience, safe thermal heat, and a dedicated hydraulic clearing tool allows you to break through the toughest internal sludge. Taking a non-destructive approach saves immense amounts of time, preserves the integrity of your machinery, and keeps your operations running at peak efficiency. For durable, professional-grade grease fittings, cleaner kits, and lubrication accessories designed to withstand the harshest industrial environments, visit Jinlin Industry to equip your maintenance fleet with the right tools for the job.
While a standard manual grease gun maxes out around 10,000 PSI of static pressure, a hammer-struck hydraulic cleaner tool generates an instantaneous kinetic shockwave. Depending on the force of the hammer strike, this acoustic wave can easily exceed the equivalent of 15,000 to 20,000 PSI for a fraction of a millisecond. This sudden spike is what shatters the hardened soap thickener without damaging the surrounding metal.
Standard WD-40 is excellent for displacing moisture or loosening a lightly rusted check ball on the exterior of the fitting. However, it lacks the viscosity and hydraulic properties required to push through a deep internal blockage. To clear a severely choked joint, you need a dedicated penetrating solvent combined with the sudden mechanical force of a hydraulic shock tool.
Replacing a damaged, flattened, or heavily corroded fitting is incredibly cheap and should always be your first step if the exterior is compromised. However, if the hardened clay-like clog is located deep behind the zerk inside the actual metal passage of the pin, threading in a new fitting will not solve your problem. You must still break down the internal blockage.
No. Applying heat can cause severe damage if you use an uncontrolled, high-temperature open flame like a cutting torch. Fire will instantly melt rubber dust boots, destroy internal polyurethane O-rings, and potentially alter the heat-treatment of the steel pin. To safely soften old grease, always use an industrial electric heat gun on a moderate setting, keeping it moving constantly to warm the surrounding metal casting safely.
This happens due to "hydraulic lock." When the grease cannot push past the clog, the extreme pressure builds up inside the coupler, forcing its internal steel jaws to bite down aggressively onto the zerk fitting. Never pull or twist it off forcefully, as this will snap the zerk. Instead, unscrew the outer barrel of the coupler slightly to bleed the pressure, and it will slide off easily.


