+86-25-8470-5507


Views: 0 Author: Site Editor Publish Time: 2026-09-18 Origin: Site


Servicing a rear differential is a standard weekend project for many DIY mechanics. However, performing a transfer case or transmission fluid exchange presents a completely different set of physical and technical hurdles. Manual transmissions operate under immense shear stress. They require highly specialized lubrication to keep synchronizers and gears shifting seamlessly. Have you ever tried lying on a freezing concrete floor, attempting to squeeze thick gear oil upward into a cramped transmission tunnel? It is an exercise in pure frustration.
Because modern vehicle undercarriages feature incredibly restrictive packaging, gravity-feeding new fluid from a standard quart bottle is virtually impossible. There simply is not enough vertical clearance to invert the plastic container. Consequently, utilizing a professional-grade fluid extraction gun is the most practical, efficient method for servicing these drivetrain components.
The primary distinction between these two procedures lies in accessibility and fluid dynamics. Differentials sit at the extreme ends of the front or rear axles. Once the vehicle is safely elevated, access is relatively straightforward. In contrast, gearboxes are tucked high up into the center chassis.
This tight clearance is exactly why the flexible hose of a dedicated extraction tool becomes mandatory. A pliable tube can be snaked over scorching exhaust pipes, bulky crossmembers, and delicate shift linkages directly into the recessed fill port. Furthermore, the chemical profiles of the fluids differ significantly. While differentials often rely on heavy, high-viscosity gear oils fortified with friction modifiers, manual gearboxes might require specific manual transmission fluids (MTF) or even automatic transmission fluid (ATF), depending on strict manufacturer specifications.
Pumping high-viscosity gear oil requires a methodical approach rather than brute force. Heavy lubricants inherently resist flow. This characteristic becomes aggressively pronounced in colder ambient temperatures. If you attempt to force the fluid into the casing too quickly, you risk blowing out the internal rubber seals of your pump or introducing damaging air bubbles into the mechanical system.
To ensure a smooth and efficient gearbox oil transfer, experienced technicians rely on a few empirical practices:
Thermal Management: Viscosity decreases exponentially as temperature rises. Submerge your unopened bottles of new gear oil in a bucket of hot water for roughly twenty minutes before the service. This simple thermodynamic trick thins the fluid significantly, drastically reducing the physical strain required to push the plunger.
Consistent Pressure: When injecting fresh fluid, apply steady, even pressure to the T-handle. Rapid, jerky motions can cause the hose to violently whip out of the fill hole. The result? A massive, foul-smelling spill across your garage floor.
Volume Tracking: Always consult your specific vehicle service manual for the exact fluid capacity. Keep a close eye on the barrel's capacity markings to track exactly how many ounces you have injected, preventing a messy overfill before the final level check.
Recent automotive industry analyses reveal a massive shift in how independent repair shops and home mechanics approach drivetrain maintenance. Modern vehicle undercarriages are increasingly encapsulated. They feature aerodynamic skid plates, noise-dampening shields, and highly complex exhaust routings. Because of this, traditional drain-and-fill methods are becoming highly inefficient.
Removing these obstructive panels simply to access a bottom drain plug adds up to an hour of unbillable labor to a standard service ticket. Specifically, search data and shop equipment purchasing trends indicate a surging demand for manual and pneumatic extraction devices. Mechanics are actively seeking ways to bypass physical barriers by extracting and refilling fluids entirely through accessible top-side fill ports. This evolution highlights a broader aftermarket trend: the prioritization of time-saving, precision instruments over brute-force teardowns. Today's modern garage leans heavily into specialized extraction technology to maintain profitability and reduce the physical toll on technicians.
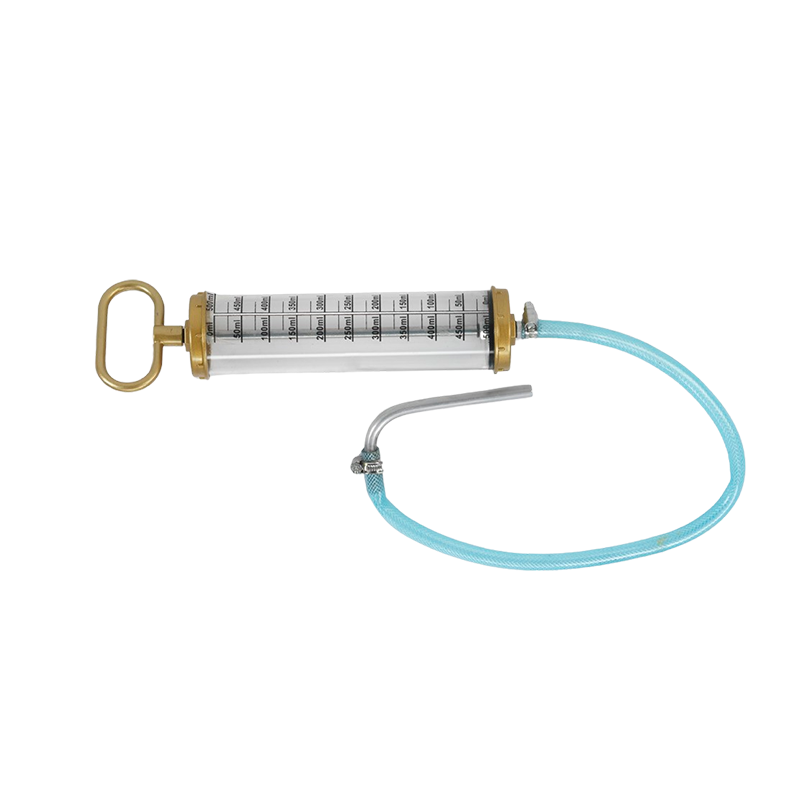
Within hardcore automotive maintenance communities, a fiery debate continuously rages regarding the absolute best method for completing a differential fluid service. One camp strictly advocates for using a suction tool to draw out the old fluid through the fill hole to save time. The opposing side insists that completely unbolting and prying off the rear differential cover is the only acceptable way to perform the job. Ultimately, both methods possess empirical validity depending on the vehicle's maintenance history, current mileage, and operating environment.
| Comparison Criteria | Suction Gun Extraction | Differential Cover Removal |
|---|---|---|
| Time Investment | 10 - 15 minutes. Highly efficient. | 1 - 2 hours (includes RTV cure time). |
| Leak Risk | Zero. Factory seal remains perfectly intact. | High if mating surfaces aren't prepped properly. |
| Fluid Removal | Removes 90-95% of old fluid. | Removes 100% of fluid and sludge. |
| Visual Inspection | Limited to what is extracted in the fluid. | Full visual access to ring and pinion gears. |
While a suction tool is phenomenal for standard 30,000-mile maintenance intervals, certain catastrophic mechanical scenarios dictate a full, invasive teardown. If you have recently purchased a high-mileage used truck and the drivetrain history is a mystery, removing the cover allows you to visually inspect the ring and pinion gears for uneven wear patterns, pitting, or violently chipped teeth.
Heavy metal contamination is another massive red flag. As gears wear down over years of abuse, they shed microscopic steel particles. If your suction process pulls up thick, silvery sludge or large metallic flakes, you must remove the cover to physically wipe the internal magnet clean. Finally, if you submerge your axle during a deep water crossing and the extracted fluid resembles a thick strawberry milkshake, water has breached the seals. A full cover removal is the only way to spray out the emulsified mess with brake cleaner and halt internal rust.
Not all fluid extractors are created equal. Buying a cheap, plastic syringe from a discount auto parts store will almost certainly result in blown seals and a mess on your first use. When selecting a tool for thick gear oils, you need to look at specific engineering parameters.
First, consider the capacity. A 500ml capacity gun is highly maneuverable and perfect for passenger car manual transmissions or tight transfer cases. However, if you are servicing heavy-duty truck differentials, stepping up to a 1000ml (1-liter) capacity barrel will drastically reduce the number of times you need to refill the chamber, speeding up the workflow.
In addition, focus on the build materials. Professional-grade tools utilize heavy-wall aluminum or high-strength composite barrels. Look for knurled barrel designs that provide a non-slip grip when your hands are covered in grease. Internally, the plunger must feature dual-lip synthetic rubber seals (often Viton or similar oil-resistant compounds) to maintain a strict vacuum and prevent high-viscosity fluid blow-by. A wide-diameter flexible hose is also critical; a narrow hose will create immense flow resistance, causing severe muscle fatigue in your forearms.
A precision manual oil suction gun is only as reliable as the post-job maintenance it receives. An extraction pump relies entirely on a vacuum created by tight-fitting seals dragging against a smooth cylindrical barrel. Neglecting to clean the tool after handling highly corrosive, sulfur-rich automotive fluids will rapidly lead to seal degradation, a total loss of suction power, and eventual tool failure.
Gear oil has a notoriously pungent smell and leaves behind a thick, sticky film that stubbornly clings to everything. Allowing this residue to sit inside the barrel for months can cause the rubber plunger to swell and permanently seize against the walls.
Immediately after completing your garage session, aggressively purge the gun. Push the handle all the way forward to expel as much residual lubricant as possible into your waste pan. Next, draw a small amount of a mild, rubber-safe citrus degreaser or mineral spirits into the main chamber. Vigorously pump the cleaning fluid in and out to break down the stubborn oil film coating the inner walls.
A critical warning from the garage: Never use harsh aerosol brake cleaners, carburetor cleaners, or pure acetone inside the barrel. These aggressive, highly volatile solvents will instantly dry out, shrink, or crack the delicate internal O-rings. Once the barrel is relatively spotless, wipe down the exterior casing with a clean shop rag to remove greasy fingerprints, ensuring a firm grip for your next project.
Proper storage is critical to preventing accidental cross-contamination and keeping your pristine garage floor free from slippery hazards. Even after a meticulous purging, a few rogue drops of oil will inevitably cling to the inside of the corrugated hose.
Store the gun in a vertical orientation if your tool chest allows it, keeping the hose pointing securely upward. Alternatively, place the nozzle of the hose into a heavy-duty zip-lock bag and tightly secure it with a rubber band. If you routinely perform various fluid exchanges, it is highly recommended to label your equipment. Using the identical automotive maintenance tool for engine coolant extraction and gear oil injection without exhaustive sterilization can introduce water into your drivetrain, leading to devastating mechanical friction. Treat your equipment with respect, and it will deliver years of leak-free reliability.
It can effectively extract suspended microscopic wear particles that are actively floating within the old fluid. However, it lacks the raw velocity to suck up heavy metal chunks or thick, magnetic sludge that has firmly adhered to the factory drain plug or settled into the deep, restrictive crevices at the bottom of the casing. If you suspect severe internal gear wear, removing the differential cover for a manual visual inspection is absolutely required.
It depends entirely on your vehicle type. A 500ml extractor is lighter, easier to maneuver in cramped spaces, and ideal for standard sedans or sports cars with lower fluid capacities. A 1000ml extractor is slightly bulkier but is the superior choice for trucks, SUVs, and heavy-duty differentials, as it requires half the pumping cycles to complete a high-volume fluid transfer.
Assuming the vehicle is already safely elevated and the fluid has been slightly warmed to reduce viscosity, the actual extraction and injection process usually takes less than 15 minutes. This is a massive time-saver compared to the hour or more required to remove a differential cover, scrape old gaskets, apply new RTV silicone, and wait for it to cure.
While physically possible, professional mechanics strongly advise against it. Mixing incompatible automotive chemicals can trigger catastrophic system failures. For instance, introducing even a trace amount of residual engine coolant into a rear differential will instantly destroy the gear oil's delicate lubricating properties. The safer, far more practical approach is to purchase dedicated, color-coded extractors for specific fluid categories.
The vast majority of modern manual gearboxes, transfer cases, and solid axle differentials utilize a brilliant "fill-to-spill" engineering design. First, ensure the vehicle is sitting perfectly level on jack stands or a hydraulic lift. As you inject fresh fluid into the upper fill port, closely monitor the threaded opening. The internal system has reached its exact, factory-specified capacity when a thin, steady stream of fresh fluid begins to gently weep over the bottom threads of the hole. Once this dripping occurs, simply remove the hose, wait for the flow to slow to a crawl, and reinstall the fill plug to the manufacturer's precise torque specifications.
A reliable fluid extractor transforms one of the most dreaded garage chores into a streamlined, highly efficient process. By eliminating the archaic need to squeeze rigid plastic bottles into impossible spaces, you drastically reduce the risk of toxic spills and wasted, expensive synthetic lubricants.
Whether you are tackling a routine differential fluid service to prepare for a heavy towing season, or executing a complex gearbox fluid swap to cure notchy shifting, having the proper equipment is half the battle. Remember to always crack the fill plug loose before draining the system, warm your fluids to manipulate viscosity, and meticulously clean your tools after the final bolt is torqued down.
By adhering to these professional techniques and investing in quality extraction equipment, you can take total control of your vehicle's preventative maintenance schedule. Stop paying exorbitant dealership labor rates for straightforward fluid exchanges. If you are looking to upgrade your garage arsenal with professional-grade capacities (500ml/1000ml) and durable aluminum construction, explore the specialized manual oil suction guns at Jinlin-ind to tackle your next drivetrain service with absolute confidence.


